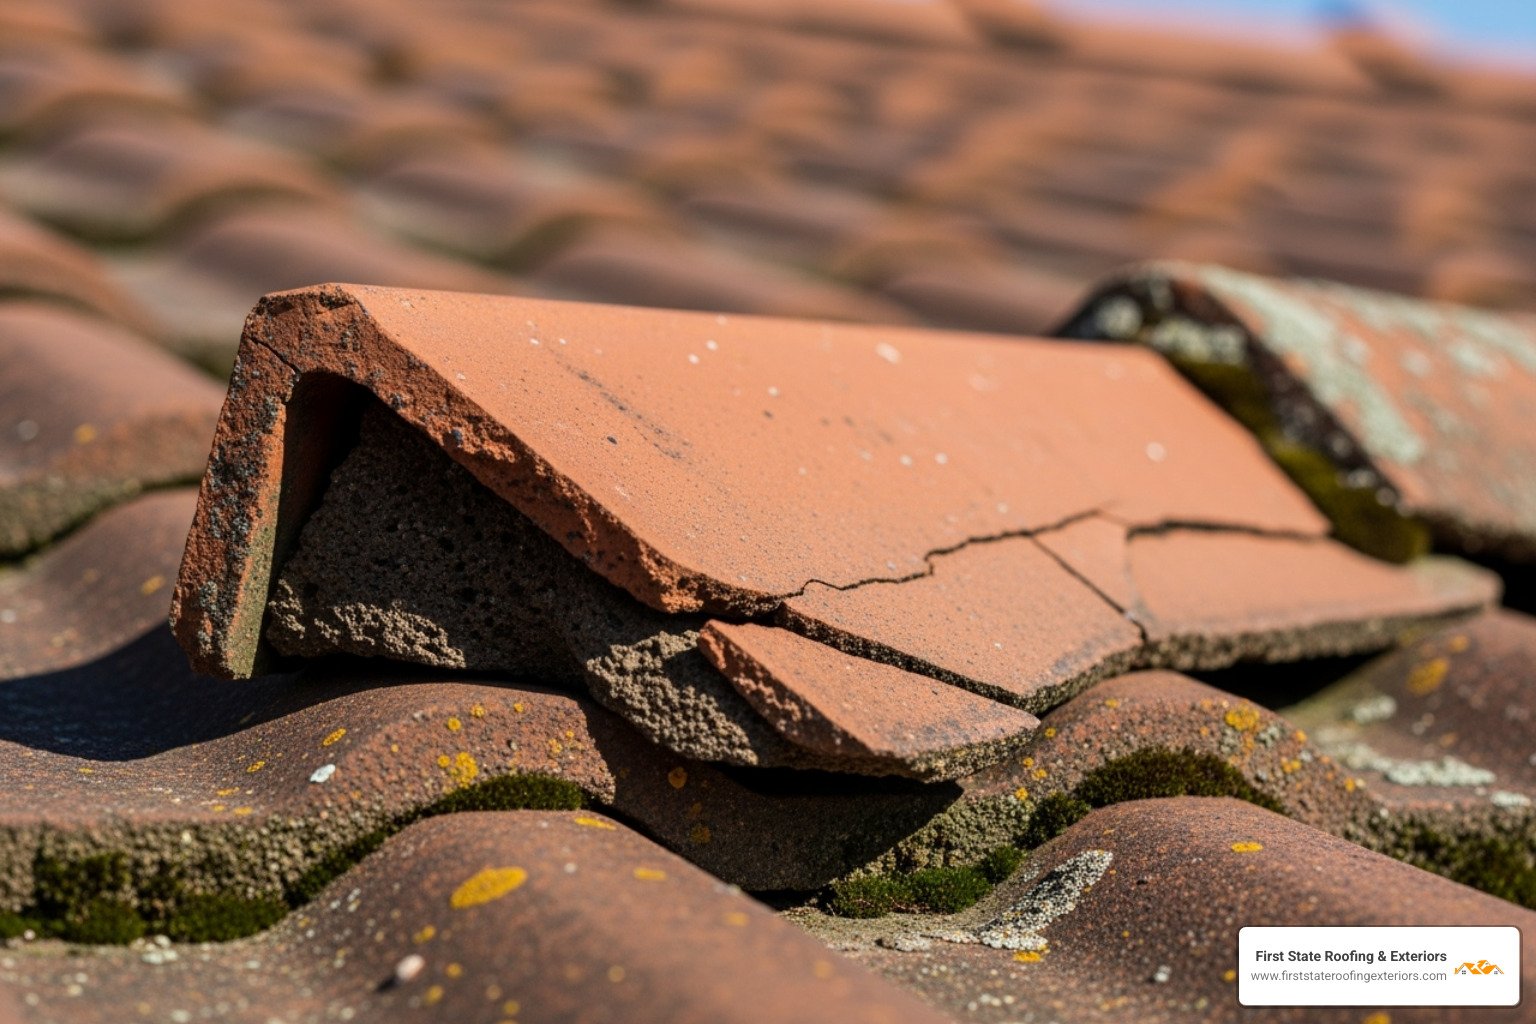
Why a Single Broken Tile is a Big Deal
Knowing how to replace broken roof tile safely—and doing it quickly—isn’t just about aesthetics. A single damaged tile creates a weak point in your home’s primary defense system against Delaware’s unpredictable weather. If you’d rather have a pro handle it, First State Roofing & Exteriors offers free estimates. Call us at (302) 222-4065 for a free inspection and fast, reliable service.
Quick Answer: How to Replace a Broken Roof Tile
- Safety first – Use proper ladder safety and harness
- Lift surrounding tiles with a pry bar to access the damaged one
- Remove broken pieces and old nails carefully
- Clean the area and check underlayment for damage
- Apply roofing adhesive to the new tile
- Slide into position and secure if needed
- Lower overlapping tiles back into place
That cracked or missing tile might look minor, but it’s actually a breach in your roof’s waterproof barrier. Many roof leaks start at slipped or broken tiles. Even small cracks can let rainwater penetrate your roof structure, leading to expensive water damage, mold growth, and structural problems.
Delaware homeowners face unique challenges with aging roofs and storm damage. When tiles break, water doesn’t just drip through – it can travel along roof decking and pop up anywhere in your home. The longer you wait, the more costly the repairs become.
For comprehensive roof protection and expert guidance, trust the proven roofing services that Delaware residents rely on.
I’m Richard McCain, owner of First State Roofing & Exteriors, and I’ve spent over 20 years helping Delaware homeowners replace broken roof tile issues before they become major problems. My hands-on experience with residential and commercial projects across the state has shown me that quick action on tile repairs saves homeowners thousands in water damage costs.

Replace broken roof tile terms to learn:
Before You Begin: Safety, Tools, and Finding the Right Tile
Before you climb that ladder to replace broken roof tile, let’s talk preparation. This isn’t the time to channel your inner daredevil – rushing into roof work without proper planning is like playing Russian roulette with gravity (and gravity always wins).
The truth is, this preparatory stage can make or break your entire repair project. A few extra minutes spent getting organized will save you hours of frustration and potentially a very expensive trip to the emergency room.
Essential Safety Precautions

Working on roofs is serious business. Falls from height cause more construction injuries than any other single factor, and your roof repair isn’t worth risking your safety. The Health and Safety Executive guidance for working at height makes it crystal clear – planning ahead saves lives.
Weather conditions are your first checkpoint. Only attempt repairs on completely dry days with no wind. Wet tiles become ice rinks, and even morning dew can send you sliding. If there’s any chance of rain or if winds are picking up, postpone the job.
Ladder safety forms the foundation of your entire operation. Your ladder needs to be sturdy, placed on level ground, and extend at least three feet above the roof edge. Think of it as your lifeline – because that’s exactly what it is. Having someone hold the base steady isn’t just helpful, it’s essential.
Personal protective equipment isn’t optional. A safety harness anchored to a secure point prevents falls on steeper roofs. Heavy-duty gloves protect your hands from sharp tile edges that can slice through skin like butter. Non-slip boots with thick soles give you the grip you need on potentially slick surfaces.
The buddy system isn’t just for swimming. Never work on a roof alone. Your helper can hand you tools, spot potential hazards, and most importantly, call for help if something goes wrong.
Here’s the bottom line: if your roof is steep, over one story high, or you feel even slightly uncomfortable about the job, it’s time to call professionals who do this safely every day.
Tools and Materials Checklist
Getting your tools and materials ready before you start prevents those frustrating mid-job trips to the hardware store. Nothing breaks your momentum like realizing you’re missing a critical tool while balanced on a roof.
Essential tools include your sturdy ladder and safety harness for access and protection. A pry bar becomes your best friend for lifting overlapping tiles without breaking them. You’ll need a hammer for breaking up damaged pieces and potentially securing the new tile. A wire brush cleans debris from the installation area, while thin shims or a brick trowel help hold adjacent tiles up while you work.
Materials matter just as much as tools. Your replacement tile is obviously crucial – we’ll cover finding the right match in detail below. Roofing adhesive or sealant secures your new tile and provides weatherproofing. Some installations require corrosion-resistant nails, especially in high-wind areas like coastal Delaware. Keep underlayment patch material handy in case you find damage beneath the broken tile.
For slate tile repairs, you’ll also need tin snips and lead strips for the traditional hooking method that’s been used for centuries.
Identifying and Sourcing the Correct Replacement Tile
Finding the perfect replacement tile can feel like searching for a needle in a haystack, but it’s absolutely critical for both function and appearance. A mismatched tile sticks out like a sore thumb and might not shed water properly.
Tile type and profile must match exactly. Concrete and clay tiles each have distinct characteristics, and within each category, you’ll find flat tiles, S-shaped profiles, barrel tiles, and interlocking designs. Each profile is engineered to work with its identical siblings – mixing profiles is asking for leaks.
Color matching presents its own challenge. Your existing tiles have weathered and faded over years of Delaware sun and storms. A brand-new tile might look jarringly different next to its aged neighbors. Taking a clear photo in good natural light helps when you’re shopping for replacements.
Manufacturer stamps on the underside of existing tiles provide valuable clues. These markings can help you identify the exact model and potentially order directly from the source.
Sourcing replacement tiles requires some detective work. If your roof is relatively recent, your original contractor might have left spare tiles – we always do this for our clients throughout Delaware. Local roofing suppliers often stock common tile types, while architectural salvage yards can be goldmines for unique or vintage tiles.
For hard-to-find tiles, try checking with neighboring properties that share your roof style. Sometimes you can source a tile from an inconspicuous area of your own roof, like a garage or shed that isn’t visible from the street.
If you’re struggling to find an exact match, especially for older Delaware homes with unique tile styles, professional roofers have networks and resources that homeowners simply can’t access. We’ve helped countless homeowners track down perfect matches for tiles that seemed impossible to find. If you need help, call First State Roofing & Exteriors at (302) 222-4065 for a free inspection and estimate.
How to Replace a Broken Roof Tile: A Step-by-Step Guide
With your safety gear on and tools at the ready, you can begin the replacement. The key is to work slowly and deliberately to avoid breaking adjacent tiles. Patience is your best friend on a roof – rushing leads to more broken tiles and potentially dangerous situations!

Now comes the moment of truth. When you replace broken roof tile sections, the process requires precision and care. Think of it like performing surgery on your roof – every movement matters.
Step 1: Expose and Remove the Damaged Tile
This is where your patience really pays off. You need to access the broken tile without turning your neighbors into casualties of war.
Start by locating the exact tile that needs replacing. It sounds obvious, but sometimes damage isn’t as clear from up close as it appeared from the ground. Once you’ve confirmed the culprit, it’s time to create some working space.
Lifting overlapping tiles is your next challenge. The tile you’re replacing will be tucked under the tile directly above it, and depending on your roof’s design, possibly overlapped by tiles on either side. Use thin shims or two pieces of timber to carefully lift the bottom edge of these overlapping tiles. This creates the gap you need while protecting the good tiles from damage.
For severely cracked or stubborn tiles, breaking the tile carefully might actually be your best strategy. Using a hammer to break the damaged tile into smaller pieces makes removal much easier and reduces the risk of damaging surrounding tiles. Don’t worry about being gentle with the broken tile – it’s already done its job.
Removing old nails comes next. Use your pry bar to extract any nails that were holding the tile in place. Be thorough here – leftover nails can puncture your new tile or damage the underlayment. Think of this as archaeological work, but with more immediate consequences if you miss something.
Cleaning debris is crucial before moving forward. Clear away all tile fragments, dust, and loose material from the work area. While you’re at it, inspect the underlayment – that waterproof membrane beneath the tiles. If you spot any holes or tears, patch them immediately with roofing cement. The underlayment is your roof’s true waterproof barrier; the tiles are just its bodyguards.
This is also a perfect time for a quick inspection of the surrounding area. Look for other cracked, loose, or missing tiles while you’re up there. Professional Roof Repair Services often catch multiple issues during a single visit, and you can do the same.
Step 2: Prepare and Install the New Tile
Now for the satisfying part – installing your perfectly matched replacement tile!
Test fitting the new tile should be your first move. Before applying any adhesive, carefully slide the new tile into the empty space. It should fit like a puzzle piece – snug but not forced. If it’s too tight or loose, double-check that you have the right tile profile and that all debris has been cleared.
Applying roofing adhesive requires strategic thinking. For most concrete and clay tiles, adhesive provides the primary holding power. Apply a bead of code-approved roof tile adhesive to the top of your replacement tile and to the top of the tile it will overlap. The key is proper adhesive placement – you want contact with adjacent tiles without blocking water flow. If you’re working with interlocking water channels, place the adhesive above the headlap to prevent water from pooling.
Sliding the new tile into position takes a gentle touch. Ease it upward into the gap, and don’t be surprised if you need to lift those overlapping tiles again as you maneuver the new one into place. Think of it as a three-dimensional puzzle where everything needs to align perfectly.
Securing with a nail might be necessary depending on your roof type and local wind conditions. Some tiles, particularly in high-wind zones or slate installations, require nails for extra security. If nailing is needed, carefully drive a corrosion-resistant roofing nail through the designated hole into the timber batten below. Take your time – a cracked new tile means starting over.
Step 3: Finishing the Job and Final Checks
You’re in the home stretch now! These final steps ensure your repair will stand up to Delaware’s unpredictable weather.
Lowering overlapping tiles should be done with the same care you used to lift them. Remove any shims or props you used, and gently guide the tiles back into their natural resting position over your new tile. They should settle naturally without forcing.
Ensuring a snug fit is your quality control checkpoint. Walk around and examine how everything sits together. There shouldn’t be any significant gaps, wobbles, or misalignments. If something doesn’t look right, now is the time to make adjustments.
Checking for wobbles might seem minor, but a loose tile will only get looser over time. Give your new tile a gentle test – it should feel solid and secure, just like its neighbors.
Finally, performing a visual inspection of the surrounding area wraps up your project. Step back and look at the big picture. Your repair should blend seamlessly with the existing roof. Regular roof inspections catch problems before they become emergencies, and you’ve just completed your own mini-inspection.
Take a moment to appreciate your work – you’ve successfully restored your roof’s defense system and gained valuable knowledge about your home’s protection. That’s something to feel proud of!
When to Call a Professional Roofer
While replacing one or two tiles can be a DIY job, many situations require an expert. Knowing your limits is key to avoiding a more expensive problem. We’ve seen countless homeowners turn a simple replace broken roof tile job into a costly nightmare by taking on more than they can handle.
Signs You Need an Expert to Replace a Broken Roof Tile
Sometimes the smartest thing you can do is admit when a job is beyond your skill level. Your safety and your wallet will thank you later.
Multiple broken tiles scattered across your roof often signal bigger problems lurking beneath the surface. What looks like random damage could indicate structural issues, poor installation, or severe weather damage that needs professional assessment.
Working on a steep roof pitch is where many DIY dreams turn into emergency room visits. If you feel even slightly uncomfortable with the angle or height, don’t risk it. Professional roofers have specialized equipment and years of training for these dangerous situations.
Damage to flashing or underlayment takes this repair into expert territory. When water has penetrated beyond the tile layer, you’re dealing with your roof’s critical waterproofing systems. A botched repair here can lead to thousands in water damage throughout your home.

Suspected structural damage like sagging roof sections or water stains inside your home require immediate professional attention. These warning signs often indicate problems far beyond a simple tile replacement.
If your home was built before the 1980s, those gray square tiles might contain asbestos. Never attempt to remove these yourself – the health risks are serious and handling requires specialized training and equipment.
Solar panel installations complicate everything. Removing and reinstalling panels safely requires coordination between solar installers and roofing professionals. One wrong move can damage expensive equipment or void warranties.
When you need immediate help during storms or severe damage, emergency services become essential. Water doesn’t wait for convenient timing.
Understanding Professional Costs
Let’s be honest about the numbers. Professional repairs cost more upfront, but they often save money in the long run by preventing bigger problems.
| Factor | DIY | Professional |
|---|---|---|
| Cost | Low (cost of tile & adhesive) | Higher ($450+ for minor repair) |
| Time | 1-2 hours | <1 hour |
| Risk | High (personal injury, further roof damage) | Low (insured & experienced) |
| Warranty | None | Yes (workmanship warranty) |
Professional costs vary based on tile type, roof accessibility, and repair complexity. A simple single tile replacement might run $450-800, but that includes insurance coverage, proper safety equipment, and a guarantee the job is done right.
The hidden costs of DIY mistakes can be staggering. We’ve seen homeowners cause $3,000+ in additional damage trying to save $500 on professional repair. Factor in potential medical bills from falls, and professional service starts looking like a bargain.
How Different Roof Tile Types Affect Replacement
Not all tiles are created equal, and each type brings unique challenges that affect both difficulty and cost.
Clay tiles require gentle handling due to their brittle nature. One wrong move and you’re replacing multiple tiles instead of one. Professional roofers know exactly how much pressure these tiles can handle.
Concrete tiles are heavier and often interlocked in complex patterns. Getting the alignment perfect requires experience that only comes from handling hundreds of these installations.
Interlocking tiles have precise fitting requirements. Miss the alignment by even a small amount, and water will find its way through.
Slate tiles present their own challenges with specialized tools like slate rippers and lead strips for securing. The technique is quite different from standard tile replacement.
Cedar shakes require understanding of wood movement, proper ventilation, and matching weathered wood – skills that develop over years of experience.
Each material demands specific tools, techniques, and knowledge. What seems like a simple swap can quickly become complicated when you’re dealing with specialty fasteners, custom cuts, or precise interlocking systems.
We give free estimates and are here to help with all your roofing needs. Call (302) 222-4065 to schedule a free inspection and ensure your roof stays in top condition.