Why Ridge Tile Replacement Protects Your Home’s Foundation
Ridge tile replacement is a critical home maintenance task that protects your roof’s most vulnerable area from water damage and structural problems. When ridge tiles fail, water can seep into your home’s interior, causing expensive damage to ceilings, walls, and insulation.
Quick Answer for Ridge Tile Replacement:
- Cost: $140-$820 depending on scope (1-3 tiles vs. 10+ meters)
- Timeline: 1 day for most repairs
- Key signs: Cracked mortar, loose tiles, water stains
- Safety: Always use scaffolding and safety harness
- Materials: 3:1 sand-to-cement mortar mix, matching ridge tiles
The ridge tiles along your roof’s peak take the most punishment from weather, wind, and temperature changes. Over time, the mortar holding them in place breaks down from exposure to rain and frost. When this happens, tiles become loose or fall off entirely.
Many Delaware homeowners face this issue as their homes age. Protecting your investment starts with understanding your options, from DIY repairs to hiring a full-service roofing company. The good news? With proper planning and safety precautions, ridge tile replacement can be a manageable DIY project for those comfortable working at heights.
I’m Richard McCain, owner of First State Roofing & Exteriors with over 20 years of hands-on roofing experience. Throughout my career, I’ve completed countless ridge tile replacement projects across Delaware, helping homeowners protect their biggest investment through quality craftsmanship and attention to detail. Let me guide you through this essential home maintenance task so you can tackle it safely and effectively.

When to Replace Ridge Tiles: Key Signs and Common Causes
Your roof works hard every day, but the ridge tiles at the very peak take the biggest beating from Mother Nature. These hardworking components are your home’s first line of defense against wind, rain, and temperature swings. That’s why knowing when they need attention can save you from much bigger headaches down the road.
Think of ridge tile replacement as preventive medicine for your roof. Just like you wouldn’t ignore a persistent cough, you shouldn’t overlook the warning signs that your ridge tiles are calling for help. Regular roof inspections every 10 to 15 years can catch problems before they turn into expensive disasters. For homeowners interested in learning more about how different materials age and perform, our roofing types guide offers valuable insights.

Identifying the Need for Ridge Tile Replacement
Here’s something that surprises many homeowners: while roof tiles can last around 60 years, the mortar holding your ridge tiles in place typically gives out much sooner. This creates a mismatch that can catch you off guard if you’re not paying attention.
The most obvious red flag is cracked or crumbling mortar. After years of Delaware’s freeze-thaw cycles and summer heat, even the best mortar starts breaking down. You’ll see pieces falling away, leaving gaps where water and pests can sneak in.
Visible damage to the tiles themselves is another clear signal. Sometimes a storm sends a tree branch flying, cracking or chipping your ridge tiles. Other times, you’ll notice missing tiles entirely – especially after those intense coastal storms we get here in Delaware.
Keep an eye out for tiles that are shifting or lifting. When ridge tiles start looking crooked or appear to be pulling away from the roof line, their days are numbered. Strong winds can turn these loose tiles into dangerous projectiles.
The scariest warning sign is water stains on your ceilings or walls. While ridge tiles don’t leak as often as other roof areas, failing mortar can create pathways for water to sneak into your home. Take a flashlight into your attic during the next rainy day – if you spot water stains on the wooden framework, it’s time to act fast.
Daylight visible from your attic means you have gaps that are letting in more than just light. Rain, snow, and unwelcome critters are probably finding their way in too. Speaking of pests, those same gaps become convenient entry points for wasps, birds, and other creatures looking for a cozy place to set up shop.
Finally, while a little moss or algae growth is normal on any roof, excessive buildup around the mortar joints often signals that moisture is hanging around longer than it should. This prolonged dampness gradually weakens the mortar underneath.
What Causes Ridge Tiles to Fail?
Understanding why ridge tiles fail helps explain why ridge tile replacement becomes necessary over time. It’s not about poor craftsmanship – it’s about physics and the relentless march of time.
Extreme weather exposure is the biggest culprit. Your ridge tiles sit at the highest point of your roof, taking direct hits from everything Delaware’s climate throws at them. Summer sun bakes the mortar, winter storms pound it with ice and snow, and spring winds try to lift everything loose.
The real villain, though, is the freeze-thaw cycle. Water finds tiny cracks in the mortar, then expands when temperatures drop below freezing. This expansion creates tremendous pressure, making those small cracks bigger. When spring arrives and the ice melts, the process repeats. It’s like nature’s slow-motion jackhammer, gradually destroying even the strongest mortar.
Strong winds don’t just knock loose tiles off – they create uplift forces that work the mortar loose over many years. Each gust puts stress on the connection between tile and roof, gradually weakening the bond.
Sometimes the problem starts with poor initial installation or mortar mix. If the original contractor used a weak mortar mixture or didn’t properly dampen the surfaces before application, the tiles were living on borrowed time from day one. The recommended 3:1 sharp sand to cement ratio exists for good reason.
Finally, there’s simple natural aging and material degradation. Even perfectly installed ridge tiles reach the end of their service life after 20-plus years. The mortar gradually loses its strength, and the tiles themselves can become more brittle with age.
The good news? Recognizing these signs early means you can address problems before they become emergencies. If you’re seeing multiple warning signs on your Delaware home, don’t wait for the next big storm to test your roof’s limits. Call us at (302) 222-4065 to schedule a free inspection – we’ll give you an honest assessment and a free estimate for any needed repairs.
The Complete How-To Guide for Replacing Ridge Tiles
Ready to tackle your ridge tile replacement project? This detailed walkthrough will help you complete the job safely and effectively. Working at height requires serious preparation and the right safety equipment – there’s no room for shortcuts when you’re on a roof.
Essential Tools and Materials
Getting organized before you start makes all the difference. Nothing’s worse than realizing you’re missing a crucial tool when you’re already up on scaffolding.
For the tiles themselves, you’ll need replacement ridge tiles that match your existing ones perfectly. Take a broken piece or an old tile to your local builders’ merchant to ensure you get the right color and profile. Don’t overlook salvage yards – they’re goldmines for finding matching pieces, especially if your home has unique or older-style tiles.
Your mortar materials include sharp sand and cement for mixing at a stiff 3:1 ratio. This creates a durable bond that can withstand Delaware’s changing weather patterns.
Essential hand tools cover a pointing trowel for applying and shaping mortar, a hammer and cold chisel for removing old materials, and a wire brush for thorough cleaning. You’ll also need a bucket for mixing and water for dampening surfaces.
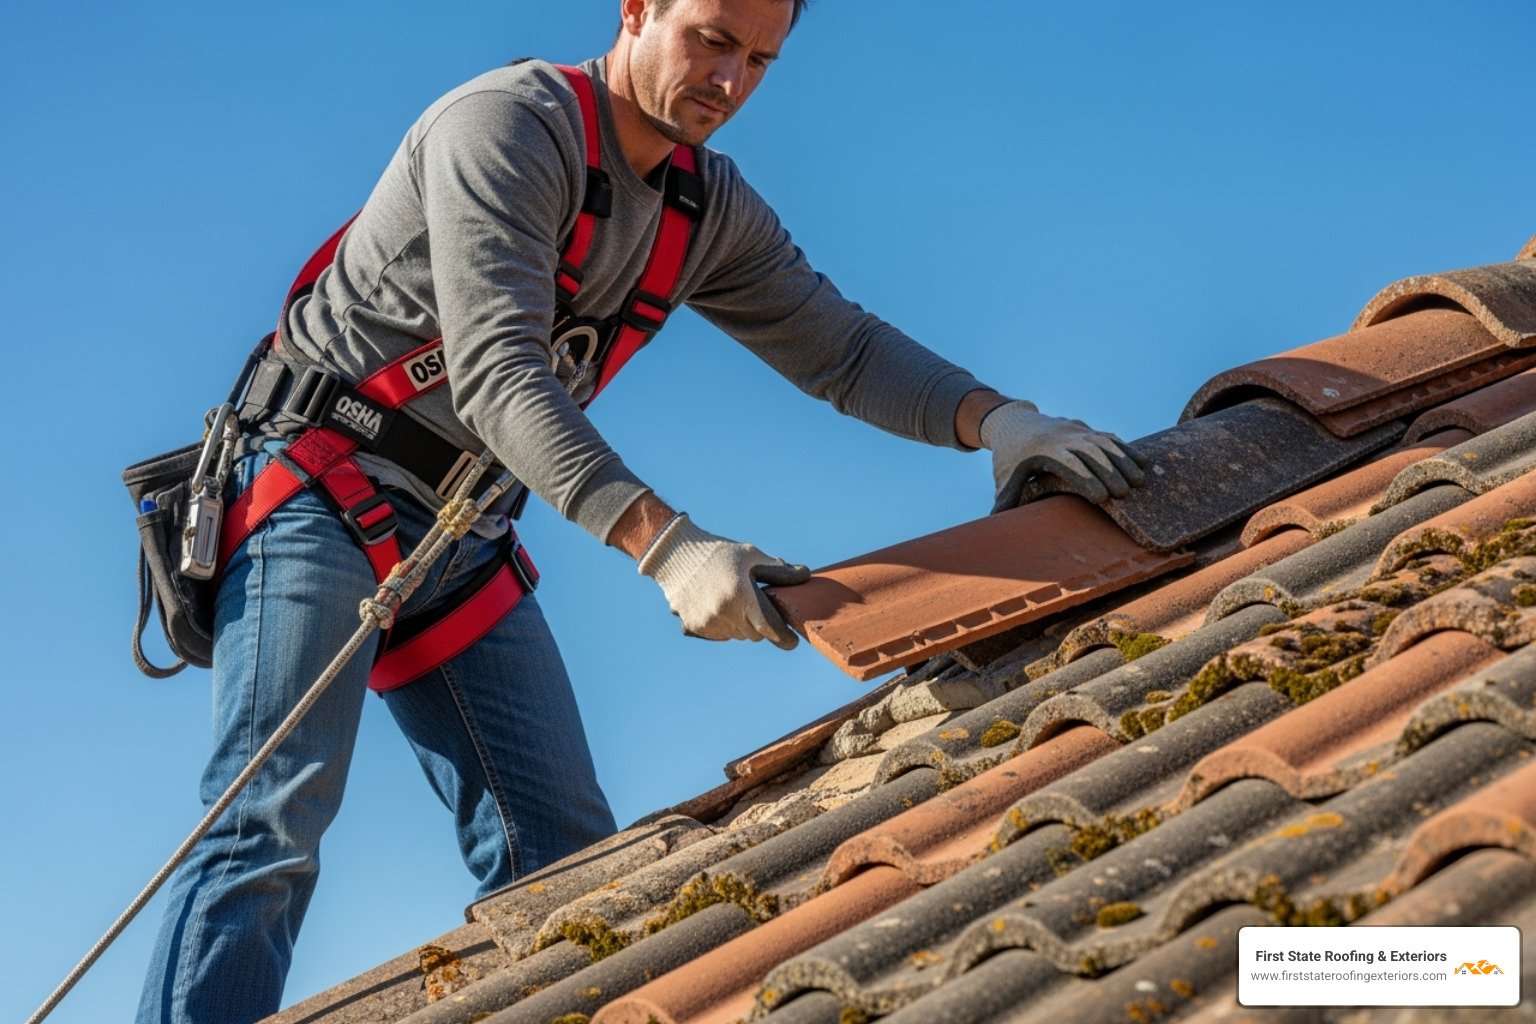
Safety equipment is non-negotiable. Safety goggles and gloves protect you during the messy removal work. More importantly, you’ll need scaffolding or a proper roof ladder (cat ladder) – never attempt this job with just standard ladders. For steeper roofs, add a safety harness to your kit. Your shoes should have soft soles with excellent traction.
Optional but helpful items include a metal spike for raking out stubborn old mortar from narrow gaps, and non-setting sealant for very small mortar cracks on otherwise solid tiles.

Step-by-Step Replacement Process
Let’s walk through your ridge tile replacement project step by step. Take your time with each stage – rushing on a roof is dangerous and leads to poor results.
Start with rock-solid safety preparations. Set up scaffolding for two-story homes or use a sturdy roof ladder for single-story houses. Never work from regular extension ladders alone. Check your local weather forecast and avoid working on wet or windy days. If your roof pitch is 4:12 or steeper, wear an arresting harness. For comprehensive safety guidelines, review OSHA’s roofing safety resources.
Remove the damaged materials carefully. Lift off any loose or obviously cracked ridge tiles first. Even tiles that seem firmly attached but show damage should come off for a proper repair. Use your hammer and cold chisel to chip away all the old, crumbling mortar from both the roof ridge and the underside of tiles you’re replacing. This tedious step is crucial – new mortar won’t bond properly to old, deteriorated material.
Clean everything thoroughly. Once you’ve removed the old mortar and debris, scrub the roof surface and tile ends with your wire brush. You want every surface completely free of dust, dirt, and loose particles before applying fresh mortar.
Mix your mortar to the right consistency. Combine sharp sand and cement in that critical 3:1 ratio, gradually adding water until you achieve a workable paste. The mortar should be stiff enough to hold its shape but not so dry that it crumbles. Getting this consistency right takes practice, so don’t rush this step.
Dampen all surfaces before applying mortar. This often-skipped step prevents dry surfaces from sucking moisture out of your fresh mortar too quickly. Use a wet brush to lightly dampen the roof ridge where the tile will sit and the underside of your replacement tile. This simple step dramatically improves the bond strength.
Apply a generous mortar bed along the sides and across the ridge where your tile will rest. Don’t be stingy here – you need enough mortar to create a solid foundation and fill any gaps. Some experienced roofers use a broken tile piece to support the mortar across gaps between roof tiles.
Position and press your new ridge tile firmly into place. Align it carefully with neighboring tiles and push down steadily until it sits level. Some mortar will squeeze out – that’s exactly what you want to see. It means you’ve applied enough material for a solid bond.
Point all the joints with your trowel to create clean, weatherproof seals. Remove excess mortar that squeezed out and smooth the joints between your new tile and the surrounding roof. Fill all gaps completely, but avoid smearing mortar on the visible tile surfaces.
For minor repairs on solid tiles, you can rake out cracked mortar joints with a metal spike and refill them with fresh 3:1 mix. Very narrow cracks sometimes respond well to colored non-setting sealant as an alternative.
Complete a final inspection while the mortar is still workable. Check that all joints are smooth and properly sealed. Allow several days for full curing, depending on weather conditions. Resist the urge to disturb newly set tiles during this critical period.
The satisfaction of completing a proper ridge tile replacement is worth the careful attention to detail. Your roof will thank you with years of reliable protection from Delaware’s weather extremes.
Cost, Materials, and Hiring a Pro: What You Need to Know
Making smart financial decisions about your ridge tile replacement project starts with understanding the real costs involved. Whether you’re planning to tackle this yourself or hire a professional, knowing what to expect helps you budget properly and avoid surprises.

Breaking Down the Cost of Ridge Tile Replacement
The price of ridge tile replacement varies dramatically depending on your specific situation. A small repair might cost you $175, while a major ridge overhaul could run $1,000 or more.
For small repairs involving 1-3 tiles, you’re looking at roughly $140-$175 for the complete job. The tiles themselves are surprisingly affordable – a single concrete ridge tile averages about $10.50. The real cost comes from labor and access equipment, especially if you’re dealing with a two-story home.
Larger projects tell a different story. Replacing 10 meters of ridge tiles typically runs around $875, with materials accounting for about $560 and labor at $310. However, this jumps to $960-$1,025 for two-story homes due to scaffolding requirements, while single-story buildings might only cost $775.
Several key factors drive these price differences. Roof accessibility is the biggest variable – working on a two-story house usually requires scaffolding, adding $185-$250 to your bill. Material type matters too, with clay tiles costing more than concrete options. Location plays a role as well; costs in areas like Seaford, DE might differ from more urban locations.
Here’s something that surprises many homeowners: labor often costs more than materials for smaller jobs. Two roofers working half a day might charge $160 in labor, while the actual tiles cost under $50. This is why it sometimes makes sense to fix a larger section at once rather than making multiple small repairs.
DIY vs. Hiring a Professional Roofer
The decision between DIY and professional installation comes down to three things: your skill level, safety concerns, and the scope of work needed.
Assessing your abilities honestly is crucial. Working with mortar isn’t particularly difficult, but doing it 20 feet off the ground changes everything. If you’ve never worked at height or handled masonry projects, this isn’t the best place to start learning.
Safety risks are real and serious. Falls from roofs cause numerous injuries and fatalities each year. Without proper scaffolding, safety harnesses, and experience, you’re putting yourself at significant risk. Professional roofers have the right equipment and know how to use it safely.
When to call a professional becomes obvious in certain situations. If you need extensive repairs, have a steep roof, or suspect underlying damage, professional expertise is worth the investment. Time constraints also matter – professionals can complete in hours what might take you days.
For comprehensive projects or when you find structural issues, consider our full Roof Replacement services. Sometimes what looks like a simple tile problem reveals bigger concerns that need professional attention.
Vetting contractors properly protects you from poor workmanship and scams. Always check for licenses and insurance – this isn’t negotiable. Ask for local references and actually call them. Get written estimates from multiple contractors with itemized breakdowns. A reputable contractor provides clear written agreements outlining exactly what work they’ll perform.
Avoiding scams is unfortunately necessary in the roofing industry. Be extremely wary of door-to-door salespeople claiming they “noticed damage” on your roof. Legitimate contractors are usually too busy to cold-call. Never agree to work from unsolicited visitors, and don’t let anyone pressure you into immediate decisions or upfront payments.
| Tile Type | Average Cost | Typical Lifespan | Pros | Cons |
|---|---|---|---|---|
| Concrete | $30-$38/m² | 30-50 years | Durable, affordable, many colors available | Heavier, prone to moss growth, may fade |
| Clay | $38-$50/m² | 50-100+ years | Classic look, extremely durable, color-fast | Higher cost, brittle when walked on |
| Composite | Varies widely | 50+ years | Lightweight, impact-resistant, eco-friendly | Higher initial cost, specific installation requirements |
Material choice affects both upfront costs and long-term value. Concrete tiles offer the best balance of cost and performance for most homeowners. Clay tiles cost more initially but can last over a century with proper care. Composite options like specialized barrel tiles provide modern benefits like lighter weight and superior durability, though they often require specific installation techniques.
Whole section replacement often makes more financial sense than piecemeal repairs. If your ridge tiles are older and multiple areas show wear, fixing everything at once saves money on repeated scaffolding setups and labor costs. When mortar fails in one spot, adjacent areas usually aren’t far behind.
The key is matching your approach to your situation. A single damaged tile from storm debris might warrant a simple repair, but widespread mortar deterioration calls for comprehensive replacement.
Frequently Asked Questions about Ridge Tile Replacement
When homeowners in Delaware face ridge tile replacement decisions, they often have similar concerns and questions. Let me address the most common ones based on my two decades of roofing experience.
Can I just patch a few tiles, or do I need to fix the entire ridge?
This is probably the question I hear most often, and the answer really depends on what’s causing the problem in the first place.
If you’re dealing with just a few newer tiles damaged from impact – maybe a tree branch fell during a storm or hail caused some cracking – then a patch repair is usually perfectly fine. These tiles were working well before the incident, so fixing just the damaged ones makes sense.
However, the story changes completely when you’re looking at older tiles with failing mortar. Here’s the thing: when mortar starts breaking down on one section of your ridge, it’s typically happening across the entire ridge line. The freeze-thaw cycles and weather exposure that damaged one area have been working on the whole ridge.
I’ve seen too many homeowners try to save money by patching individual tiles every few months, only to end up spending more in the long run. If you find yourself climbing back up there repeatedly, that’s your roof telling you it needs a complete ridge replacement.
The more cost-effective approach for older roofing systems is replacing the entire section. You’ll save on repeated scaffolding costs, get consistent materials and workmanship, and most importantly – you won’t have to worry about the next tile failure in six months.
What’s the difference between ridge tiles and hip tiles?
While they look similar and serve the same basic function, ridge tiles and hip tiles have different jobs on your roof.
Ridge tiles sit along the horizontal peak of your roof – that’s the highest line where two opposing roof slopes meet. Think of it as the spine of your roof system.
Hip tiles, on the other hand, are used on diagonal ridges that slope downward from the peak. These appear on hip-style roofs where you have four sloping sides instead of the simpler two-sided gable design.
Both types often use identical shapes – you’ll see the same half-round or angled profiles. The main difference is their placement and sometimes their securing method. Hip tiles at the bottom are often held in place with a hip iron, which provides extra stability since they’re dealing with different stress patterns than horizontal ridge tiles.
Can I claim ridge tile replacement on my home insurance?
Insurance coverage for ridge tile replacement isn’t straightforward, and I always recommend homeowners understand their policy before they need it.
What’s typically NOT covered is gradual wear and tear. If your 25-year-old ridge tiles are failing because the mortar has naturally deteriorated over time, that’s considered normal maintenance – not an insurable event.
What IS often covered are sudden, specific incidents. If a severe storm with high winds damages your ridge tiles, or a tree falls on your roof during a thunderstorm, you’ll likely have coverage. Hail damage is another common covered cause.
The key is documenting the damage immediately after the incident. Take photos, note the date and weather conditions, and contact your insurance company as soon as it’s safe to do so.
Every policy is different, so I always tell my customers to review their coverage details or call their agent. Some policies have specific exclusions or requirements for roof-related claims that you’ll want to know about beforehand.
One important tip: Don’t wait too long to file a claim if you think you have coverage. Insurance companies often have time limits for reporting damage, and waiting can hurt your chances of approval.
Secure Your Roof for Years to Come
Your home’s protection truly starts at the peak. When you spot cracked mortar or loose tiles along your ridge, taking action quickly makes all the difference between a simple ridge tile replacement and dealing with water damage throughout your home.
Whether you decide to tackle this project yourself or bring in the pros, the key is addressing those damaged ridge tiles before Delaware’s next big storm rolls through. Following the steps we’ve outlined will help ensure your roof stays watertight and structurally sound for decades to come.
The bottom line? A well-maintained ridge can easily last 20+ years, but only if you stay on top of the warning signs. That loose tile you noticed last month won’t fix itself, and waiting usually means higher costs down the road.
If you’re feeling uncertain about working at height or dealing with mortar mixing, there’s no shame in calling for backup. At First State Roofing & Exteriors, we’ve helped countless Delaware homeowners steer these exact situations. Our team understands the unique weather challenges our state faces, from coastal winds to freeze-thaw cycles that can wreak havoc on ridge tiles.
Ready to protect your investment? We provide comprehensive roof replacement services designed to keep your home safe and dry. Every job starts with a thorough inspection where we’ll assess not just your ridge tiles, but your entire roofing system.
Don’t let small problems become big headaches. Call us today at (302) 222-4065 to schedule your free, no-obligation inspection and estimate. We’ll give you straight answers about what needs attention now and what can wait – because protecting your home shouldn’t break the bank.